Why did I include a massive robot gorilla above? Why wouldn’t I? He represents strength, security, and is the bouncer of a technological paradise. In other words he represents authentication, a foundational piece of technology used in almost every web application. Let’s get to its formal definition.
Authentication: Computing: the process or action of verifying the identity of a user or process.
Without authentication, we don’t know who is who. We have no concept of a user. Up until a couple days ago Laughter Engine had no authentication and consequently such a concept of a user. It was rock and roll without a drummer. It was the seasons without summer. It was the NBA without slam dunks. It was a meal without hot sauce. In other words, it was disappointing.
Let me explain how this came to be. At first I wanted to create a product that would make people happy, bringing them smiles and great jokes that could brighten their day. One of the main features I built was the ability for a user to laugh at a joke, which would add a ranking to the joke in order to contribute to a global leaderboard of most laughed at jokes.
In addition to that, I created a section of the app which would display to the user the list of jokes they laughed at, in case they wanted to go back and reference their favorite jokes. However, there was one glaring problem with this concept. The list of a person’s favorite jokes would only be stored for the given browser session. If the user refreshed their browser or accessed the app via a different device, their favorite jokes would be wiped away. They would no longer be able to see the jokes that made them smile.
I started to think. What point is there to only remember the laughed at jokes from a single browser session? Is it even useful at all to give the user an impression that their favorite joke has been saved.
That’s when it hit me… I need to add authentication into my app. That way, I create a mapping from users to jokes, and whenever a user logs into my app, I will fetch all of their favorite jokes, displaying them to the user to their delight.
Favorite jokes would no longer be a temporary thing. They’d be permanent. For eternity, they’d be there for the user to reminisce upon.
To do this, I’d have to implement authentication, a big scary word that had me in fear with my tail between my legs when I was confronted with it in past jobs. Although I was never tasked with building out an authentication system in past jobs, I certainly had to make tweeks to some authentication related code. Quite frankly, I hated these tasks as I never fully understood how authentication works.
Now I’m proud to say I’ve implemented authentication into Laughter Engine, and I’m here to tell you that implementing it is not rocket science and doing so greatly helps with building an understanding of the technology. What was once a nightmare is now an accomplishment and I’m happy to share some of the decisions and implementation details of my authentication implementation journey. In the wise words of a Hebrew song I used to sing in summer camp: “The whole wide world is a very narrow bridge, but the most important thing is to have no fear at all. (כל העולם כולו גשר צר מאוד והעיקר לא לפחד כלל)” With that, let’s dive in.
Where do I even start?
Authentication can be built into an app through a variety of different ways…
Username/password sign up and sign in experience.
Login through a third party provider like Google, Facebook, or Github.
I ended up choosing option 2 since it’s easier to implement, and I believe it’s a more simple experience for the user. If I did option 1, I’d have to worry about saving down usernames, encrypting passwords, building a reset password flow, etc. With option 2, I don’t have to worry about it at all!
Of all the third party auth providers I could choose from, I ended up going with Google since at time of writing (2023), I believe more people are likely to have a google account than any other third party provider.
So in order to build this out, I did what most other software engineers do when they are trying to solve a problem: Search Google.
My query was something along the lines of “google login react”, and it brought me to the perfect npm package for the job: @react-oauth/google.
There were a couple of other options, but this seemed to be widely popular and functional so I just went with it and used that as the main library to hook up google auth into my app.
Well enough with the talk about overarching technological decisions. Let’s get into what the authentication flow actually looks like in the app.
User flow to authenticate
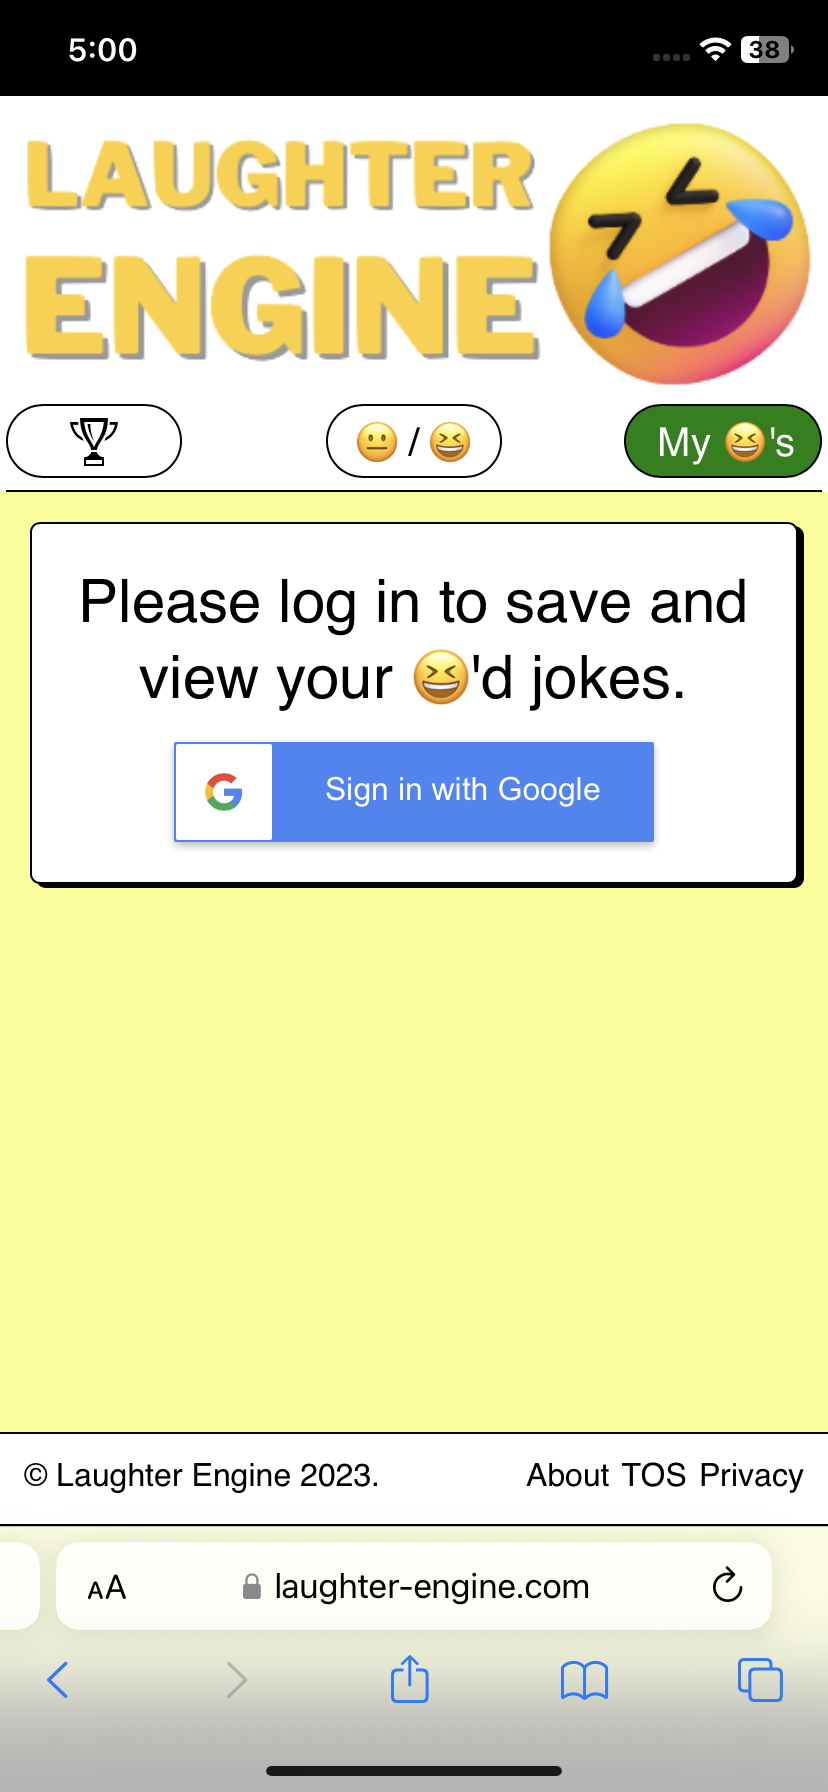
So I figured that the main use case for a user wanting to access their user data is on the section of their laughed at jokes. Accordingly, I added the auth flow to that part of the site.
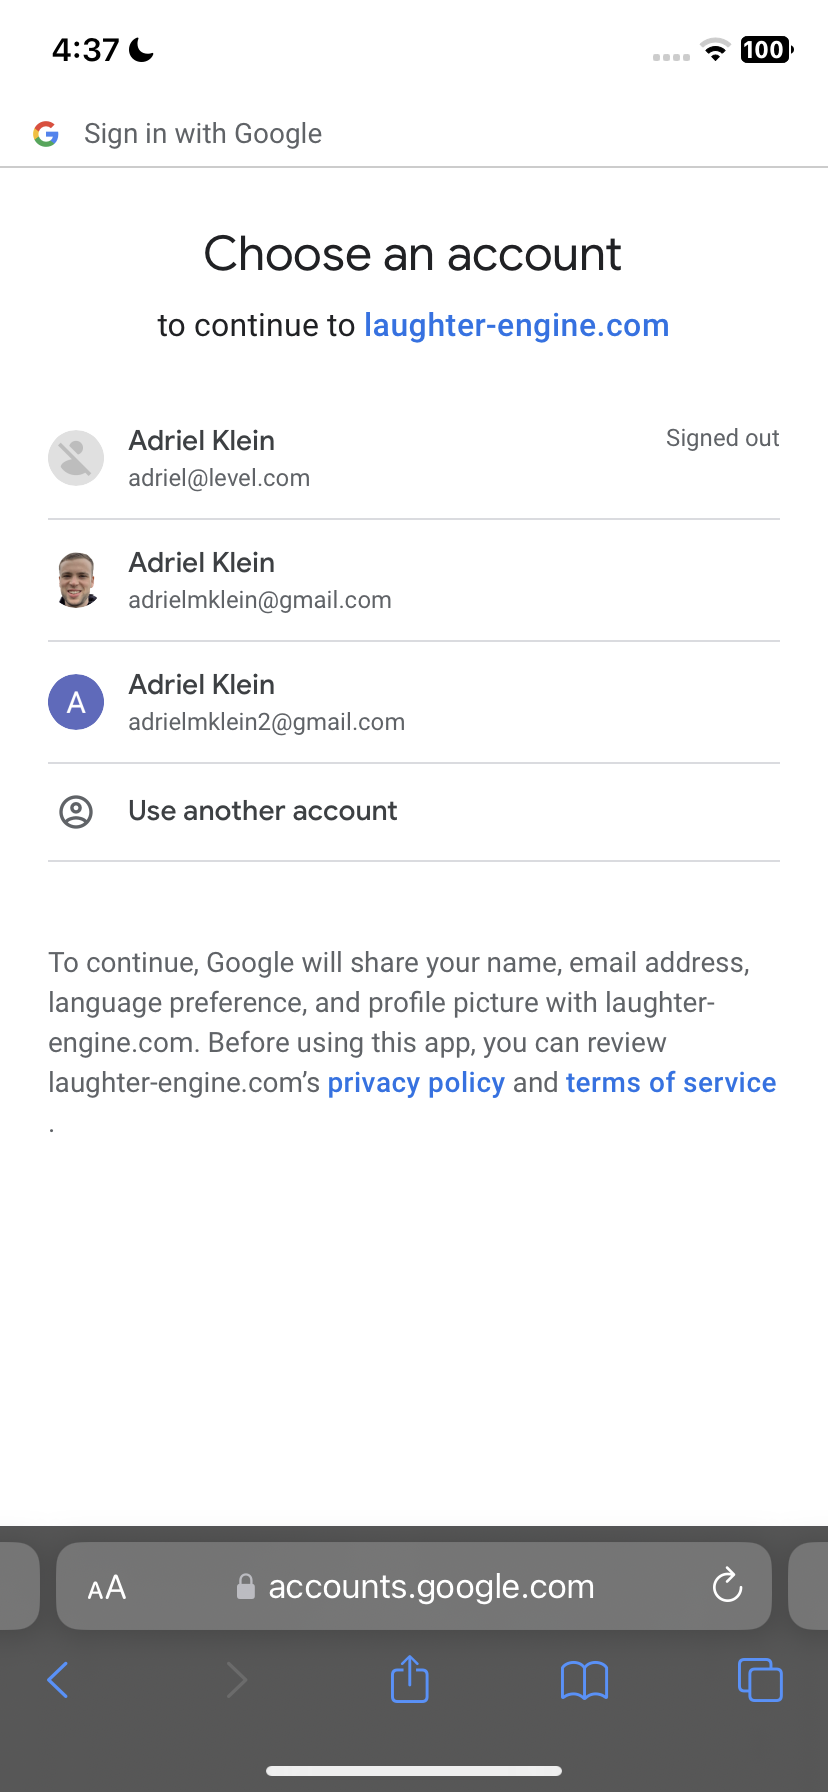
Once the user clicks on “Sign in with Google”, they are brought to a separate tab where they can log in with google.
Upon choosing their account and logging in, they are finally brought back to the app where their user jokes are displayed.
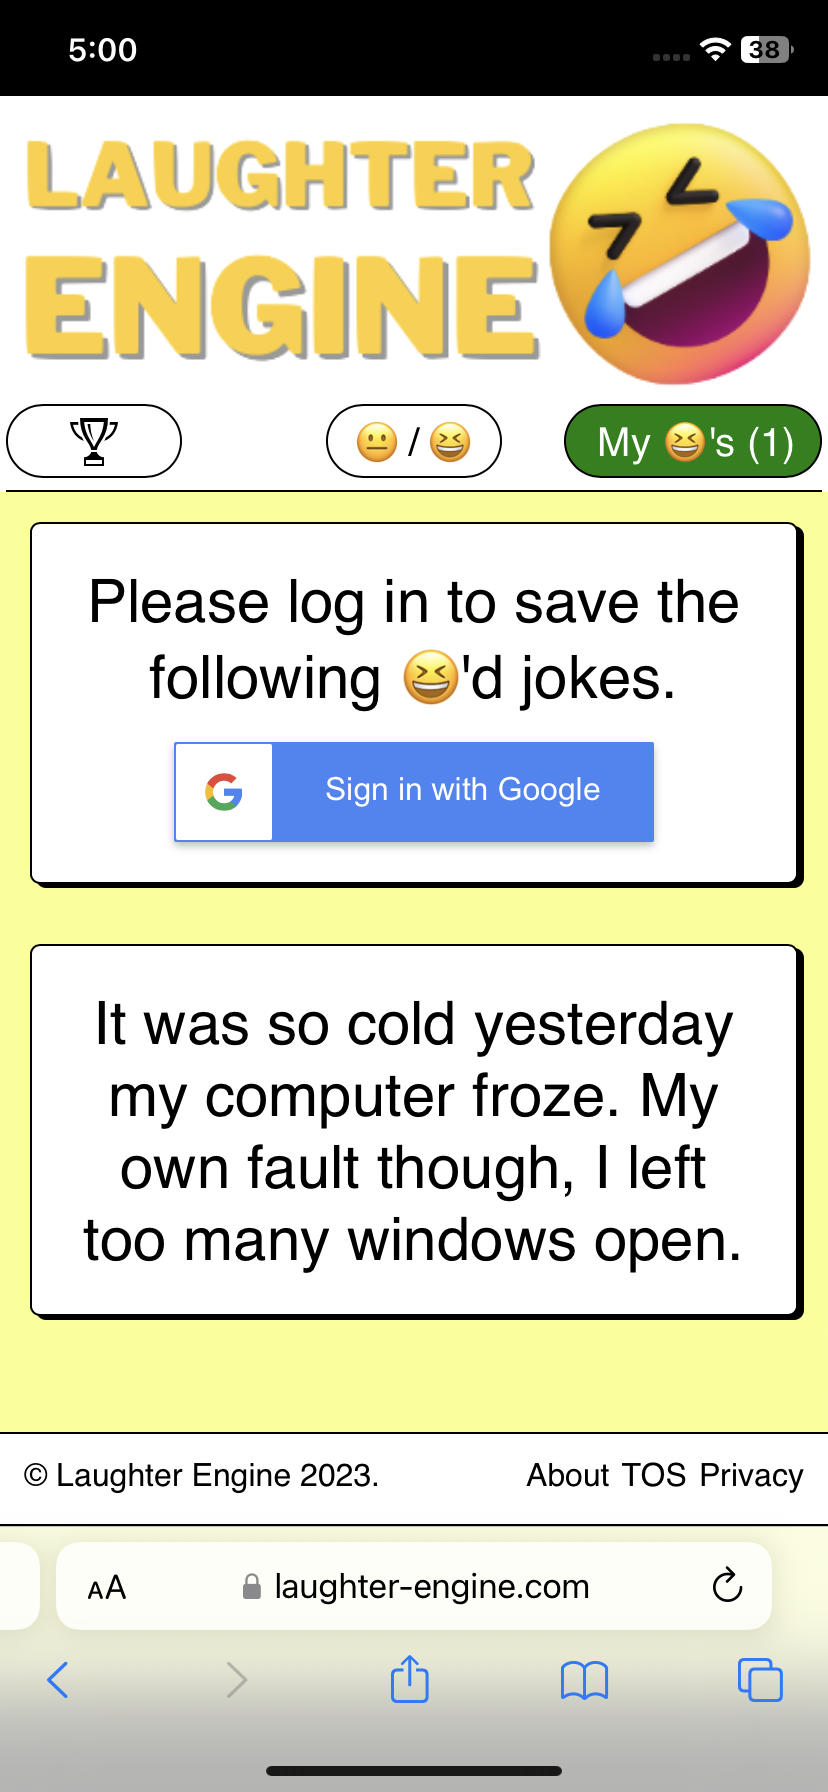
Edge case alert! Let’s say a user has already laughed at a few jokes before logging in. In this case there are a bunch of laughed at jokes in the favorite jokes section, however we still display the google sign in button.
With my messaging, I try to make it clear that these favorite jokes are only temporary and urge the user to sign in to save them permanently. Upon signing in, we save the list of temporary favorite jokes to the database so that they are added the the user’s favorite joke collection.
What database tables did you need to add to make this work?
I added just two tables to get the job done:
As you can see with the user_ table (user is a keyword in Postgres and can’t be used), it’s quite simple with just three columns. I wanted to create a concept of a userId instead of using email as an id since there’s always a chance I bring a “change email address” feature. In this case, I’d want the userId remaining the same but would just update the email field. This validates the idea that userId remains consistent and represents a single user without ever changing.
The last_login_time is an optional field, but figured I’d add it in just in case I want to add some feature to monitor how many monthly active users I have. That way I can easily set up a query such as “give me all the users who have a last_login_time within the past month.
In the user_joke table, I’m pretty much just making a mapping of users with jokes. This makes it easy later to find all the jokes associated with a user by making a query such as “give me all the user jokes where user_id is equal to some value.
What API endpoints were added to implement this?
Here’s what I added to my serverless.yml to get this done.
Given an email, either create a new row in user_ with that email or update the last_login_time of an existing row
Keep in mind here that we’re only calling this endpoint after receiving a valid response from https://www.googleapis.com/oauth2/v1/userinfo?access_token=${accessTokenForGoogleAccount} which ensures that it’s in fact a valid google email that we’re working with
GET /getLaughedAtJokes
Given a userId, get all the user jokes associated with that user
POST /addUserJoke
Given a userId and a jokeId, create an association between the user and the joke
This endpoint is only used when there are a bunch of unsaved jokes and then the user logs in. The frontend code iterates through each unsaved joke and calls the endpoint to create the association
Although these are the three new endpoints, I also needed to update the POST /rateJoke endpoint to add a user_joke whenever a logged in user laughs at a joke. Now the rateJoke endpoint also accepts an optional userId and creates the association if the userId is present. Without making this modification, favorite jokes would not get saved for logged in users.
If you’re wondering about why I didn’t make POST /addUserJoke accept an array of jokeIds instead of repeatedly calling the endpoint over and over again for every unsaved joke, then I’m glad you’re paying attention and good thinking! That would indeed be a better approach, I just haven’t got around to implementing it the correct way. I opted for a shortcut in order to save time but admit having an array of jokeIds as a parameter would be much cleaner.
How did you make it so that user specific data persists when the browser is refreshed?
Sometimes it’s great implementing something on your own, because you get to really understand why a the inner workings of technological solution is why its so widely used in the first place. For me, that’s what happened when I realized that the user data would disappear whenever the user refreshed. Although the data was still saved down, the user would have to re-login every time they open up the app on their browser after it was either closed or refreshed. NOT IDEAL!
So I went to google: best way to persist user data across browser sessions. The top three results I got were…
Session storage
Local storage
Browser cookies
I’m not going to go into a ton of detail about the difference from these three as that would be worthy of another blog post, however I will say that I went with browser cookies since they are probably the most widely used method to persist authentication related data in a browser.
Plus, cookies were never something I had a huge grasp on. Historically I’d had much more experience with the pastry version. In my career, it had only been something I’ve tinkered with and tweaked. I wanted to conquer the scary unknown!
To put it simply in my own words, a cookie is a piece of data that the browser stores and retains across browser sessions. Sometimes cookies have an expiration date, so after a certain period of time in the case of authentication you will be automatically logged out. Other times if the user clears their browser cookies, the user will be logged out as well since the cookie would have been removed.
It’s also worth noting that a cookie can be any piece of data, not necessarily data related to authentication. It’s just a key value pair, so the key could be foo and the value could be bar. But that wouldn’t be all too useful.
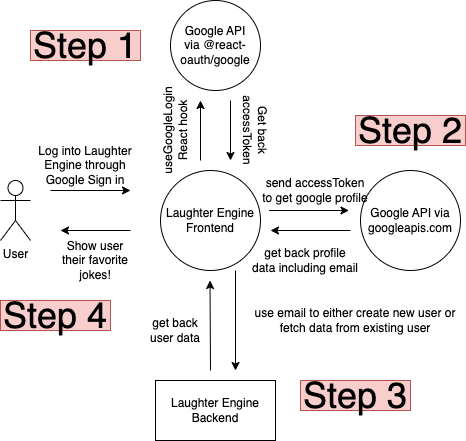
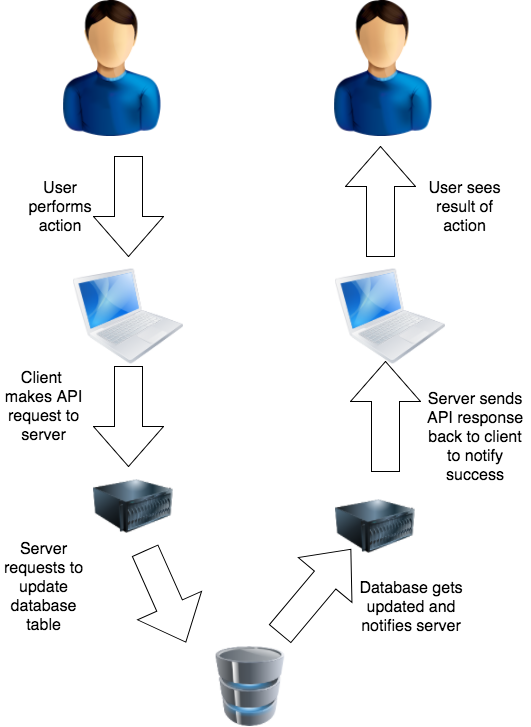
Enough talk, let’s get to the meat and potatoes here. What I ended up doing was using the @react-oauth/google npm package to fetch the google accessToken which would later be used to retrieve google profile data. That data contains a very special piece of information: the email. With the email, the frontend can then hit the custom backend api to retrieve all the user specific jokes. If that didn’t make much sense, it’s not because you are dumb. It’s just tough to follow through a paragraph. Here, let’s visualize it as a diagram.
So how do cookies fit into this?
If you take a closer look above, for step 1 we really only want to do that once and not have to do it every time a user refreshes or closes and opens a browser.
That’s where cookies come in. As you can see the result of Step 1 is that the front end is given an access token from Google. From the access token, we can do what we need to log into the app since the access token can be used to retrieve the email address which can be used to get the user’s jokes from the laughter engine backend.
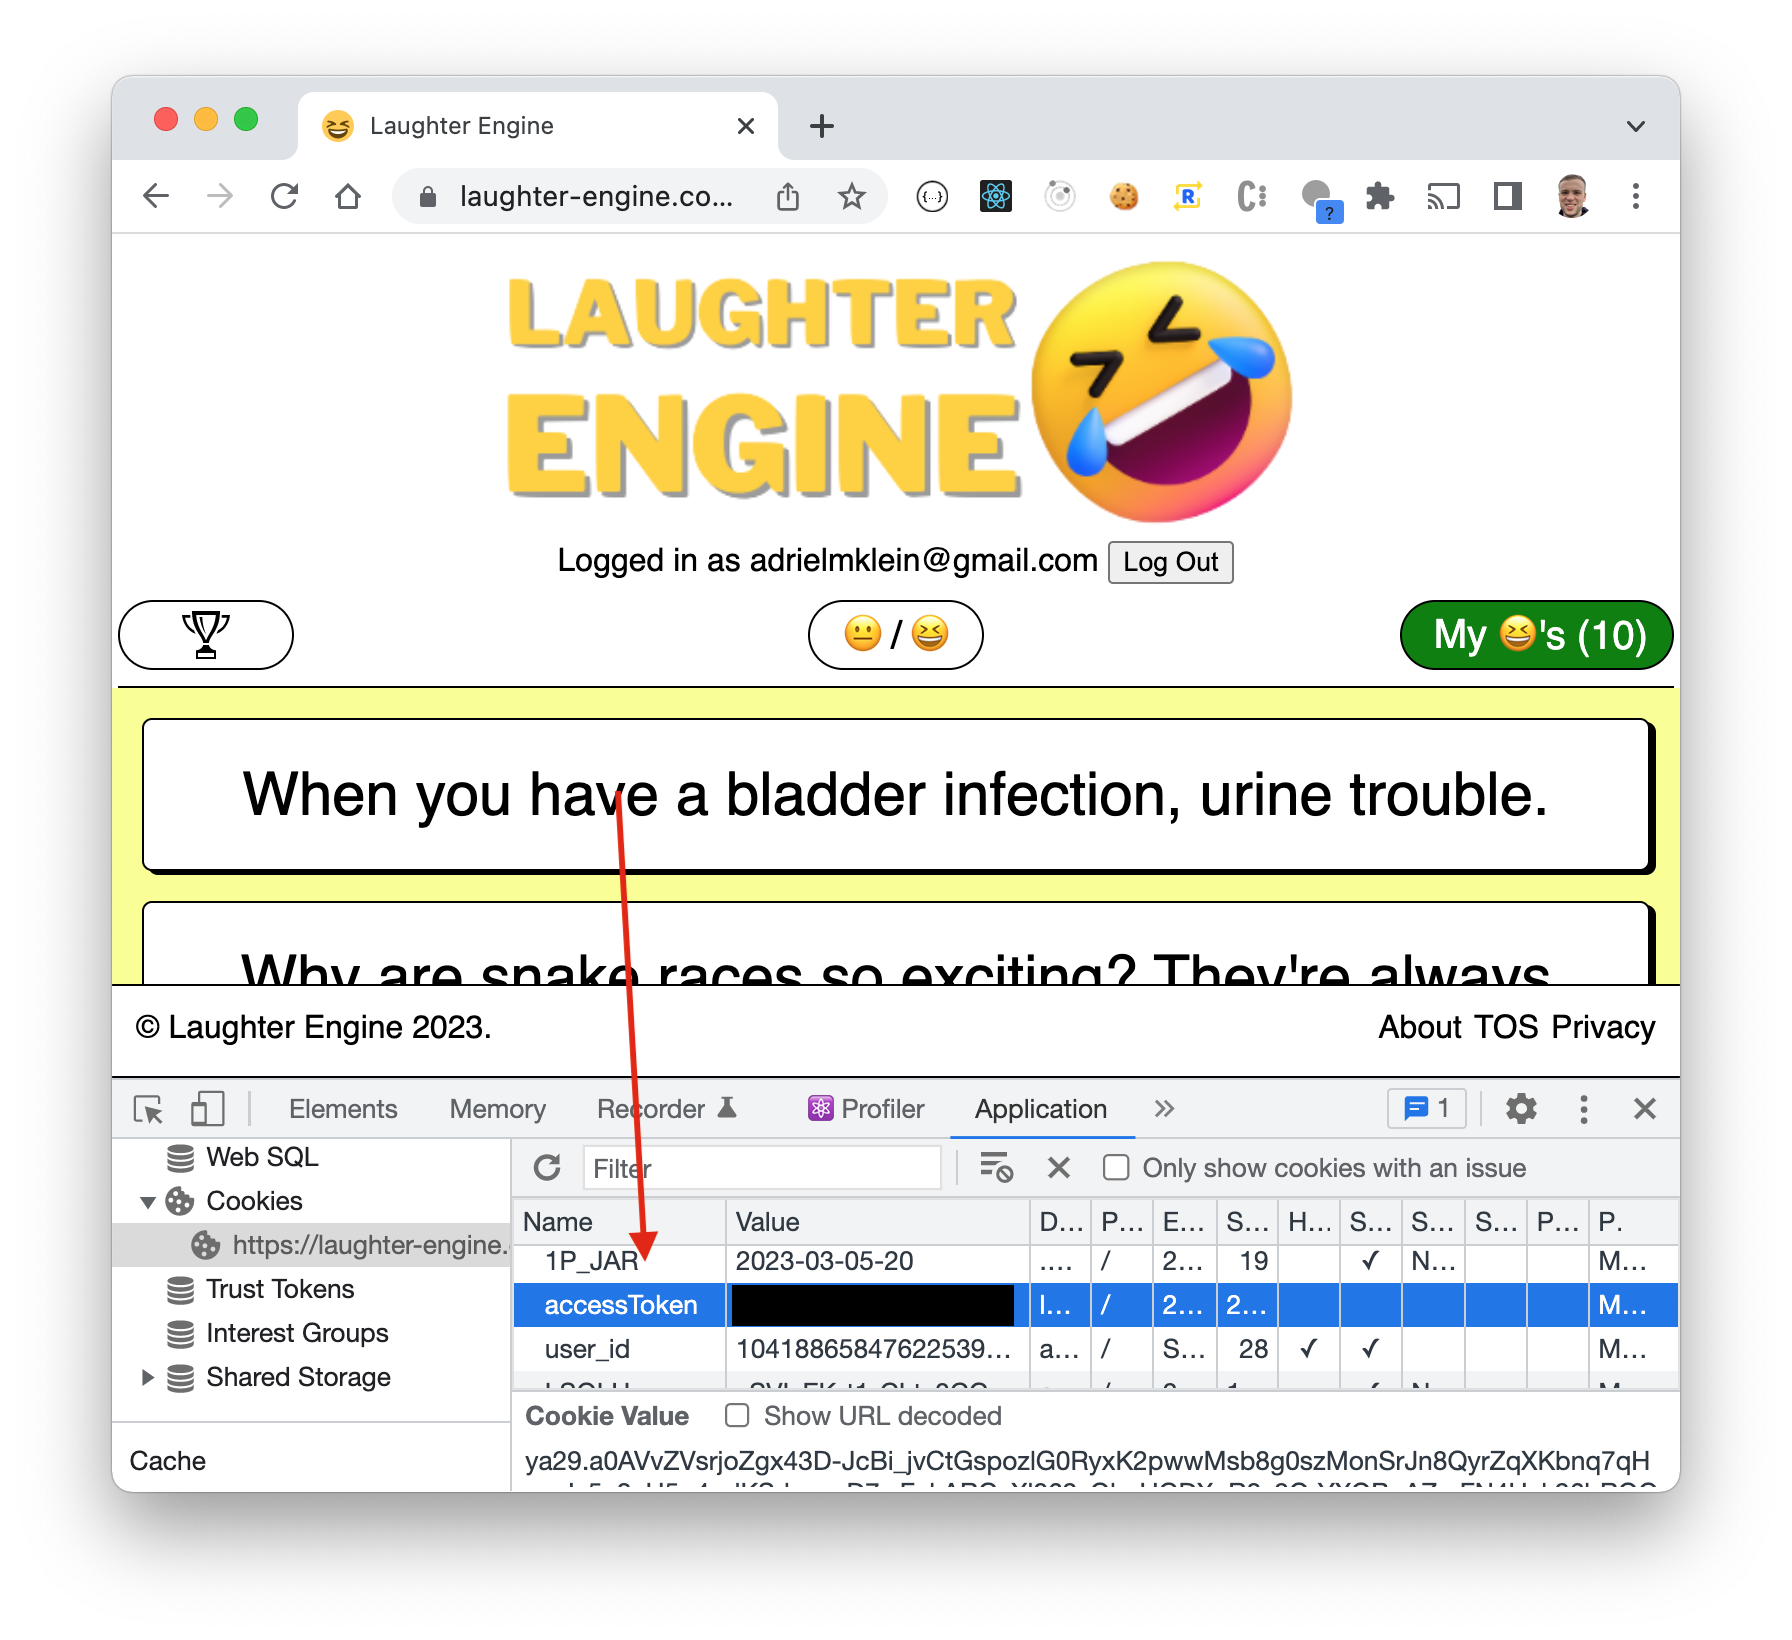
All of this explanation is to say that the access token is a special key that can be used to get the user’s data. If we hold onto the accessToken we can continue to log the user into the app and get their data. So we store the access token as a cookie like so:
As long as that access token stays there as a cookie, we will be able to keep the user logged in. As soon as the user tries to log out, we simply remove the cookie and the process starts all over again.
Do you have any security vulnerabilities
Unfortunately, yes. As I am writing this blog post, I realize that although I require the physical user to authenticate in order to see their jokes, my backend endpoint to create the user requires only an email. So if a hacker got an understanding of how my backend endpoints operate, they could potentially write a program that would continue hammering the created user endpoint with a bunch of different emails.
Moving forward, I need to make the create user endpoint more secure to require some other type of security token and only create or update the user if that token is valid.
Conclusion
Adding in authentication to a web app isn’t as hard as you may think. It’s not rocket science, but it’s not trivial either. With a little bit of dedication and focus, you can add authentication into your app too.
Years ago, I created an app that delivered dad jokes. However, as time passed, the supporting services broke down and the app fell into disrepair. Recently, I decided to revamp and revitalize the app, removing the cobwebs and bringing it back to full functionality.
When I decided to build the app, I wanted a good name. I wanted something to inspire curiosity and innovation. I decided to name it Laughter Engine. Here’s how an artificial intelligence bot interprets that name…
Okay I admit it’s creepy as heck, but it does offer a glimpse into the world of AI and how it visually perceives our words. Anyways, I’m digressing. This blog post isn’t about AI! As much as the topic has fascinated me over the past twenty four hours, I’ll save that for another post and potentially a future app built on top of the technology.
For this post, I wanted to share the behind the scenes look of how I built this full stack application and tech decisions I made as I built it.
I’m going to break this post down into several parts:
A tech stack is the combination of technologies a company uses to build and run an application or project.
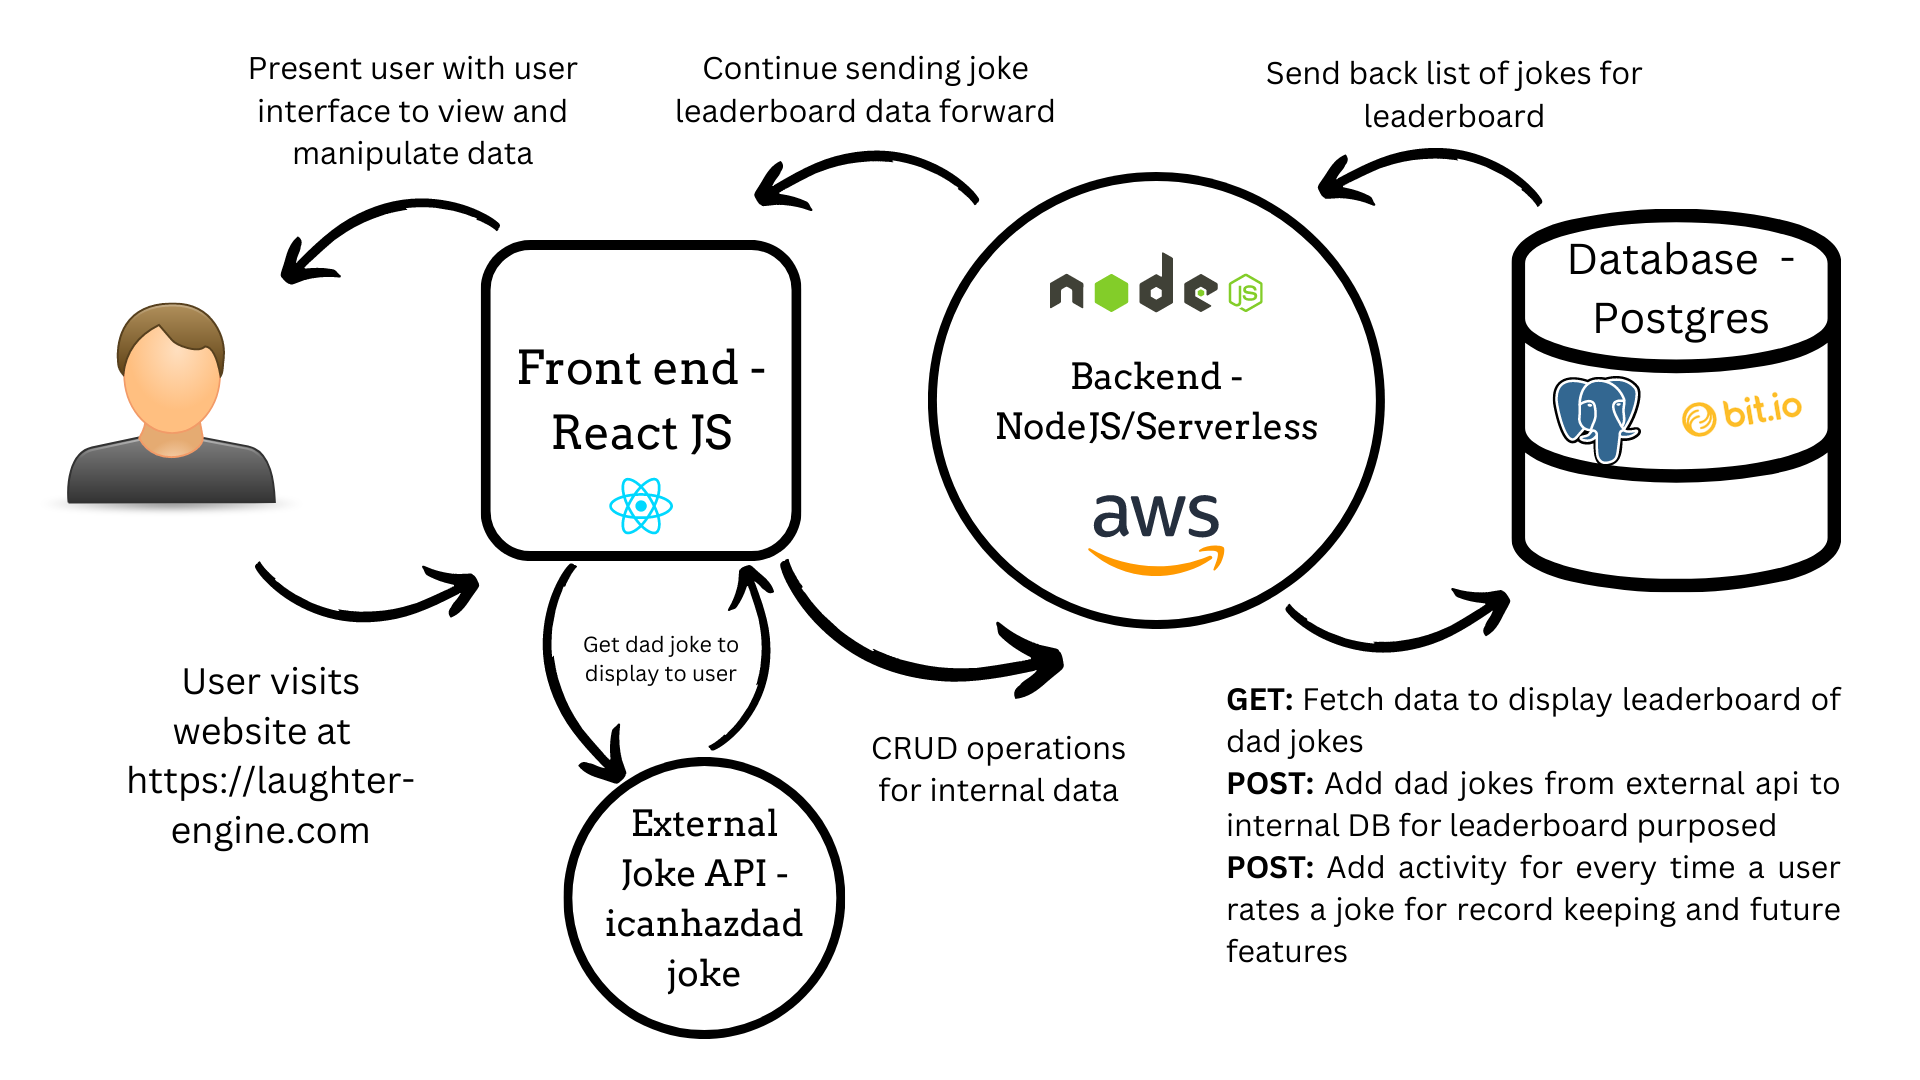
Don’t they say a picture says a thousand words? Instead of describing it all to you over text, let me give you one of the most prized possessions in the world of software engineering, a diagram.
So what you see here summarizes it, but let me explain a bit of what’s going on. The user visits my website url which, like all domains on the internet, uses a system called DNS to map the domain name to an IP address. The IP address is like a street address for the internet, it tells the internet the address of the resources users will use to access my resources.
In this case since I’m using React JS as my front end, the resource the user gets from making the HTTPS request from their browser is a javascript file. That Javascript file is in charge of generating all the resources the browser needs to display the user the app. Most notably, the javascript generates an HTML file that the browser can interpret into a web page.
From there, the React front end hits a separate API called icanhazdadjoke which conveniently offers free dad jokes to the public that the front end retrieves via a JSON format like so…
$curl-H"Accept: application/json"https://icanhazdadjoke.com/{"id":"R7UfaahVfFd","joke":"My dog used to chase people on a bike a lot. It got so bad I had to take his bike away.","status":200}
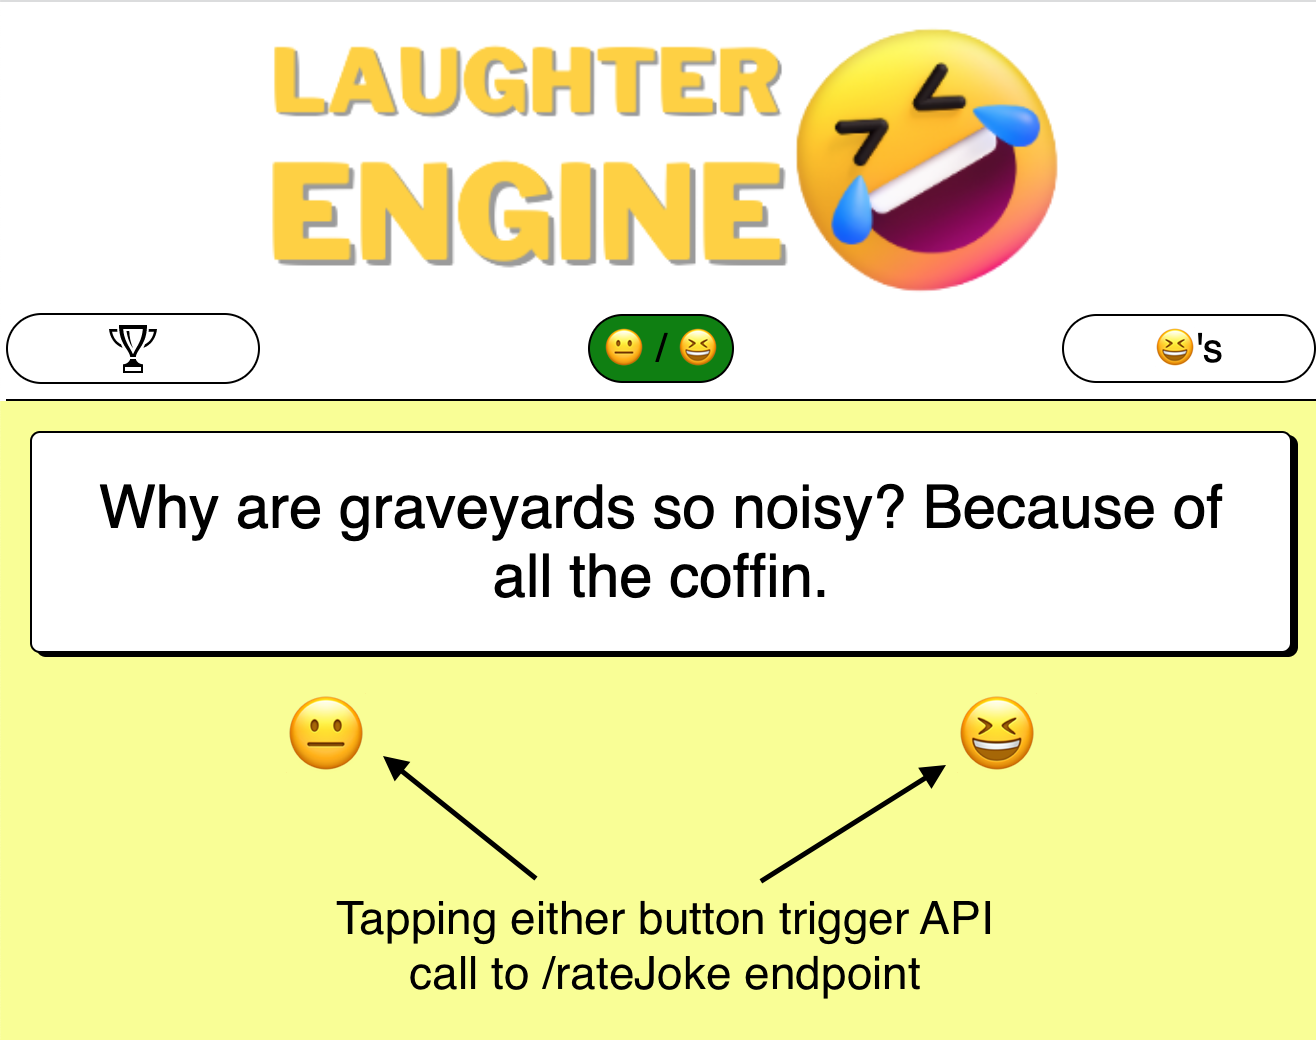
From there, the front end sends that joke right over to the user which gives them a chance to rate it…
This is where we hit the internal Laughter Engine custom web server hosted by means of Serverless, a service that makes it easy for developers to run on AWS Lambda computing platform. There’s a lot going on here but in essence what we have is a NodeJS backend that utilizes some special tools provided by amazon to abstract away many of the hairy details with building a web server so I can just focus on writing code and not on scaling resources, etc.
From there, the NodeJS backend interacts with a Postgres DB hosted on Bit.io to store jokes to generate a leaderboard to display back to the user.
Data source
Alright, let’s take a breath a bit after discussing the tech stack. There was a lot going on there, if you don’t understand all of it, don’t worry. Hopefully this section will be a little bit more easygoing.
Years ago when I decided to work on a side project, I approached the project through the sense of a front-end developer. That is, I wanted to build a user interface on top of an existing public API. I figured I’d build something cool on top of something else that already provided some awesome data set exposed via an API.
So I googled, Best public apis to build an app on top of. What I got was a huge amount of responses, but most notably, I found something that struck out to me: The Chuck Norris Jokes API
I’d always loved Chuck Norris jokes and thought it would be cool to build a platform on top of an API that supports them to rate the jokes to find the best ones.
What I’ve learned the hard way through a show and tell with my co-workers is that the API returns some offensive and insensitive jokes that definitely are not safe for work and could be considered hurtful to a variety of folks.
So I switched the API to a much more friendly one… icanhazdadjoke. Admittedly some of the jokes are fairly cheezy, but some aren’t all that bad.
The API is super kind to offer it’s jokes out for free, so the very first step in building my app was simply to fetch the dad jokes and send it back to the user as you’ll see in my architecture diagram
Building an API
I’ve already declared myself as primarily a front end engineer, so why the heck did I concern myself with building an API? That’s backend stuff right? I shouldn’t be concerning myself with it?
Wrong
As much as us software engineers sometimes pigeon hole ourselves as frontend or backend focused,
I think there’s something to be said for being versatile and building, able to work with or at least understand both ends of the stack. AKA, it’s good for every software engineer to have a bit of full stack in them.
But why Adriel do you need to concern yourself with the backend of this project?
Ah, I’m glad you asked my friend. So if my sole purpose of that app was to send users a joke from the external joke api and then send them the next one, then you’re right. I wouldn’t need to build a backend. I wouldn’t need a server. I wouldn’t need to deal with Serverless, AWS, and all these other complexities.
However, if all I did was display jokes over from another API then what good value would I actually be providing? Couldn’t I just tell users to go to icanhazdadjoke to find those jokes themselves?
In that spirit, I decided to build on top of what the joke API provided by creating a rating mechanism for the jokes. The idea is that users will rate jokes on a pass/fail basis and those that get the most pass reactions will be surfaced to the top as the best dad jokes of all time.
Now suddenly I’ve changed things around. Instead of simply displaying jokes I’ve built a platform to find the best dad joke of all time. Wow! So much more interesting! I know, right?
In order to save the ratings of the jokes I get from the API, there must be some mechanism to store the jokes across different browsers and users into one shared location.
You may be thinking, why not store this data in something like a google spreadsheet? In a way, that’s exactly what a database is. It’s a glorified google spreadsheet that makes it easy to add, update, manipulate, and delete data.
In my case, data is stored in the form of user ratings.
The API I built has the following endpoints to get, update, and modify this data:
GET /getJokeRating
– Gets the list of the jokes in sorted order by most laughed at.
POST /rateJoke
– Creates an entry in the database for a joke with its reaction if the joke has never been seen before. If the joke has already been seen, it increments the count of the reaction (pass/fail) associated with the joke.
GET /getJokeActivity
– Gets the list of joke activities as opposed to joke ratings. More info on this later.
Database design
Again, a picture says a thousand works so let me start with those…
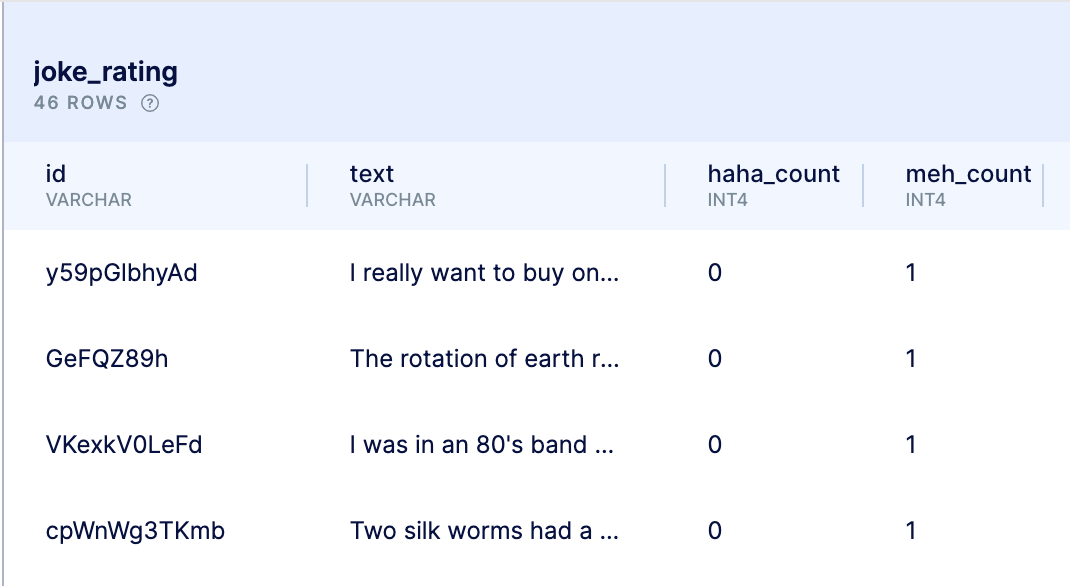
So I’ve got two tables each with four columns. Let’s look at joke_rating.
So joke_rating is really the heart and soul of the laughter engine database. In there, we have the data that will be displayed to the users. As you can see, the main two columns at the end here contain numeric values which keep track of the number of times someone has laughed at a joke. It’s whatever row in the database that has this value as the highest which deems it the funniest dad joke of all time.
So this data in activity is a bit more nuanced. Currently, the app is not displaying any data from this table, writing data to it.
Please, let me explain…
Let’s say we just had the joke_rating table. That would work just fine to keep the app functioning the way it is doing, but it poses some problems if we ever want to change things up in the future. Most notably the problem is that joke_rating had these two columns num_hahas and num_mehs that, while they do a good job for what the app offers right now, would pose a problem if we ever introduced a new reaction. If we introduced a new reaction, we’d have to create another column. Especially if a reaction can be via freeform text, then this problem would get even more hairy.
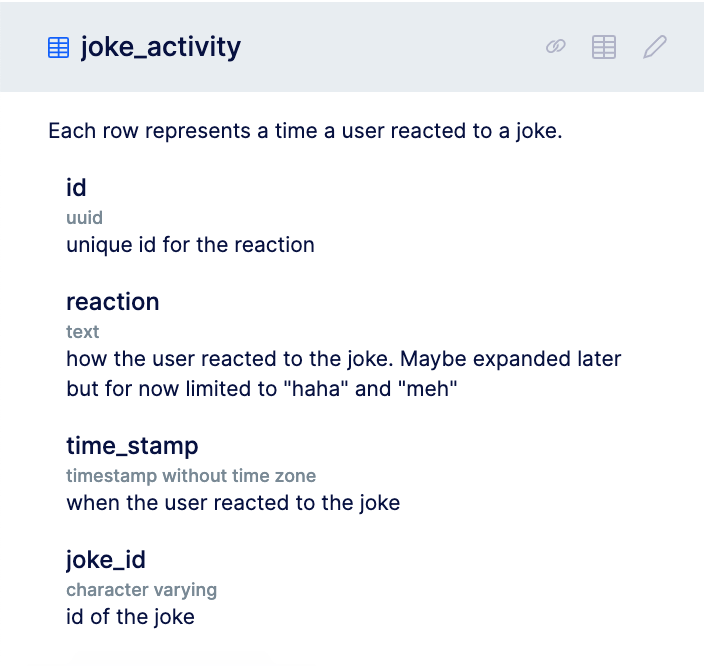
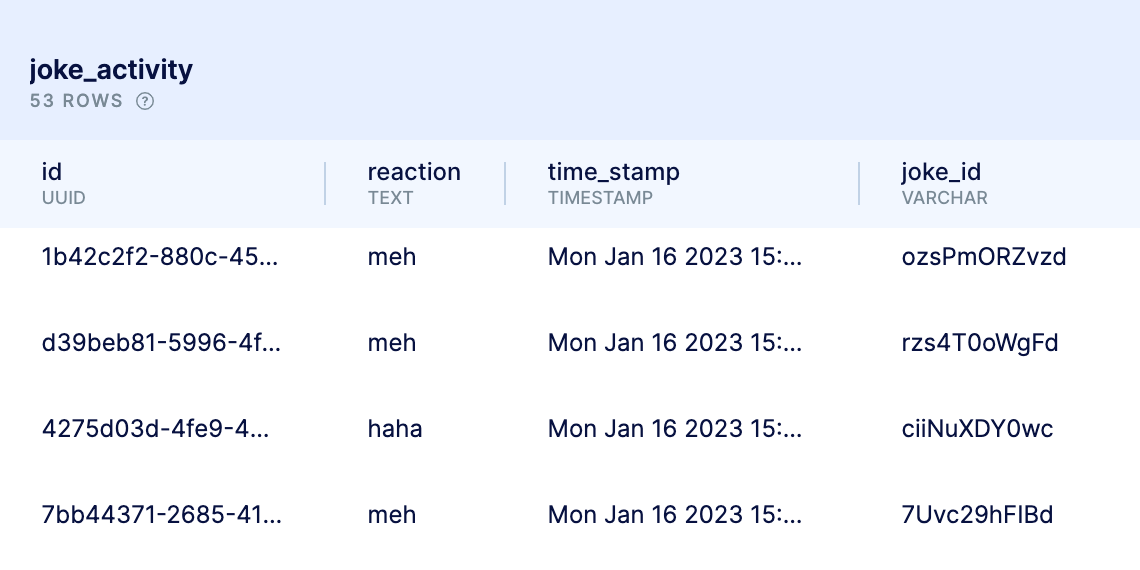
Instead, what would be better is if there’s another table that has a specific reaction column that can be any string value. THat’s where joke_activity comes into play. Since it has that exact column, now our system is capable of supporting any type of text reaction, so if we ever want to come up with a “sad” reaction, it would be super simple to store it in this table.
Now, if we ever wanted to create a leaderboard of the “saddest” reaction we could do an SQL query on the joke_activity table to group by joke_id where reaction='sad' and sort by joke id’s with the highest count.
In addition to making it more extensible for other reaction types, creating the joke_activity table offers an element that the joke_rating table simply does not: time. There’s no column for time on the joke rating table and we introduce that with joke activity so that if we wanted to find the oldest joke in the system, we can now easily do that.
So joke activity doesn’t offer us any benefits at the moment, but it’s setting ourselves up for future success in case we ever want to build upon the app. Planning for the future is good as failure to plan is planning to fail.
Marketing
What’s the point of an app if nobody uses it? That’s where marketing comes into play. People need to find out about the app. That’s one of the most important elements.
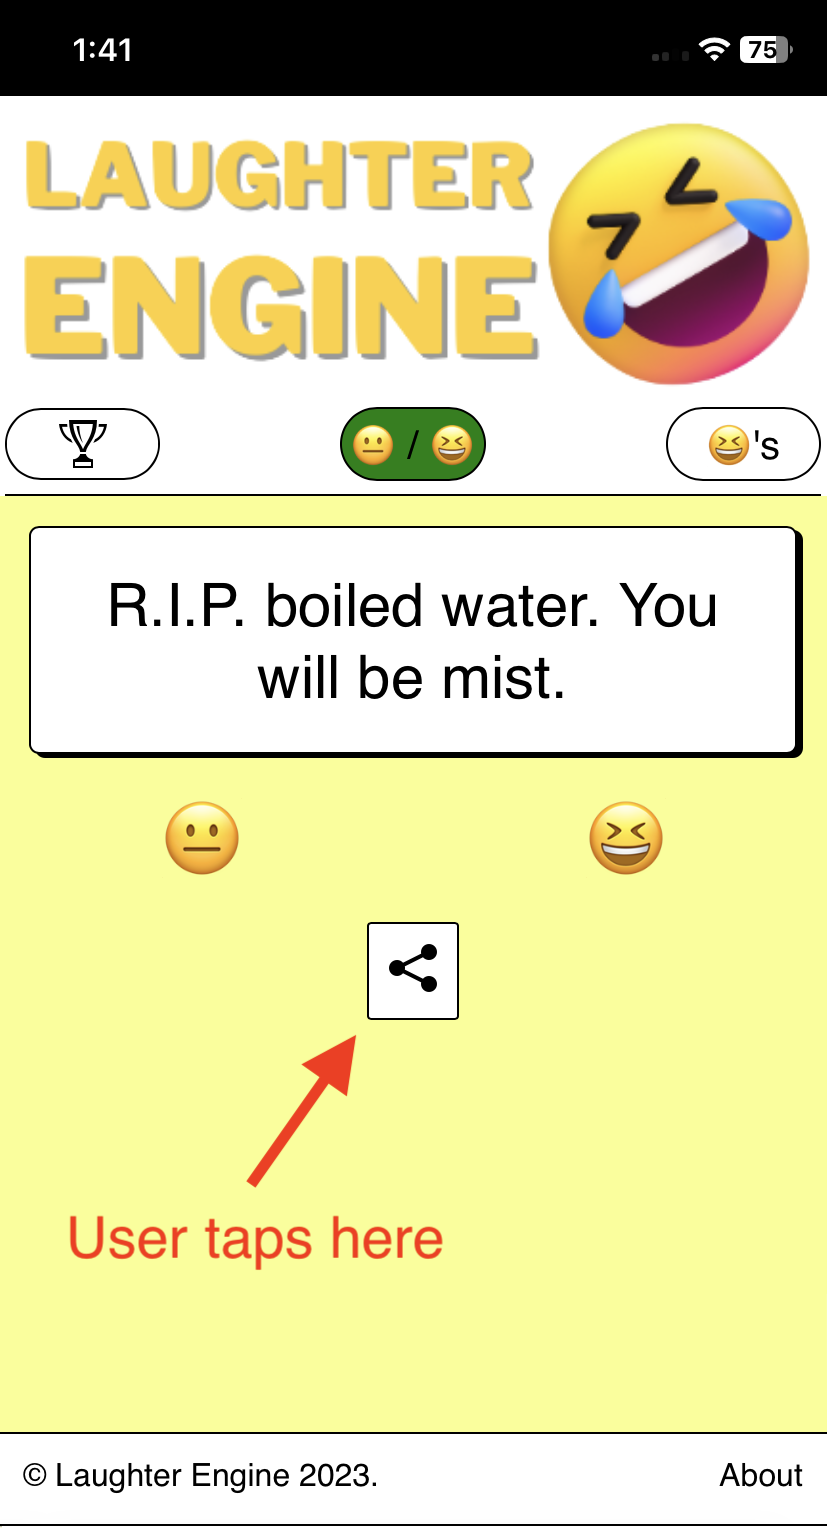
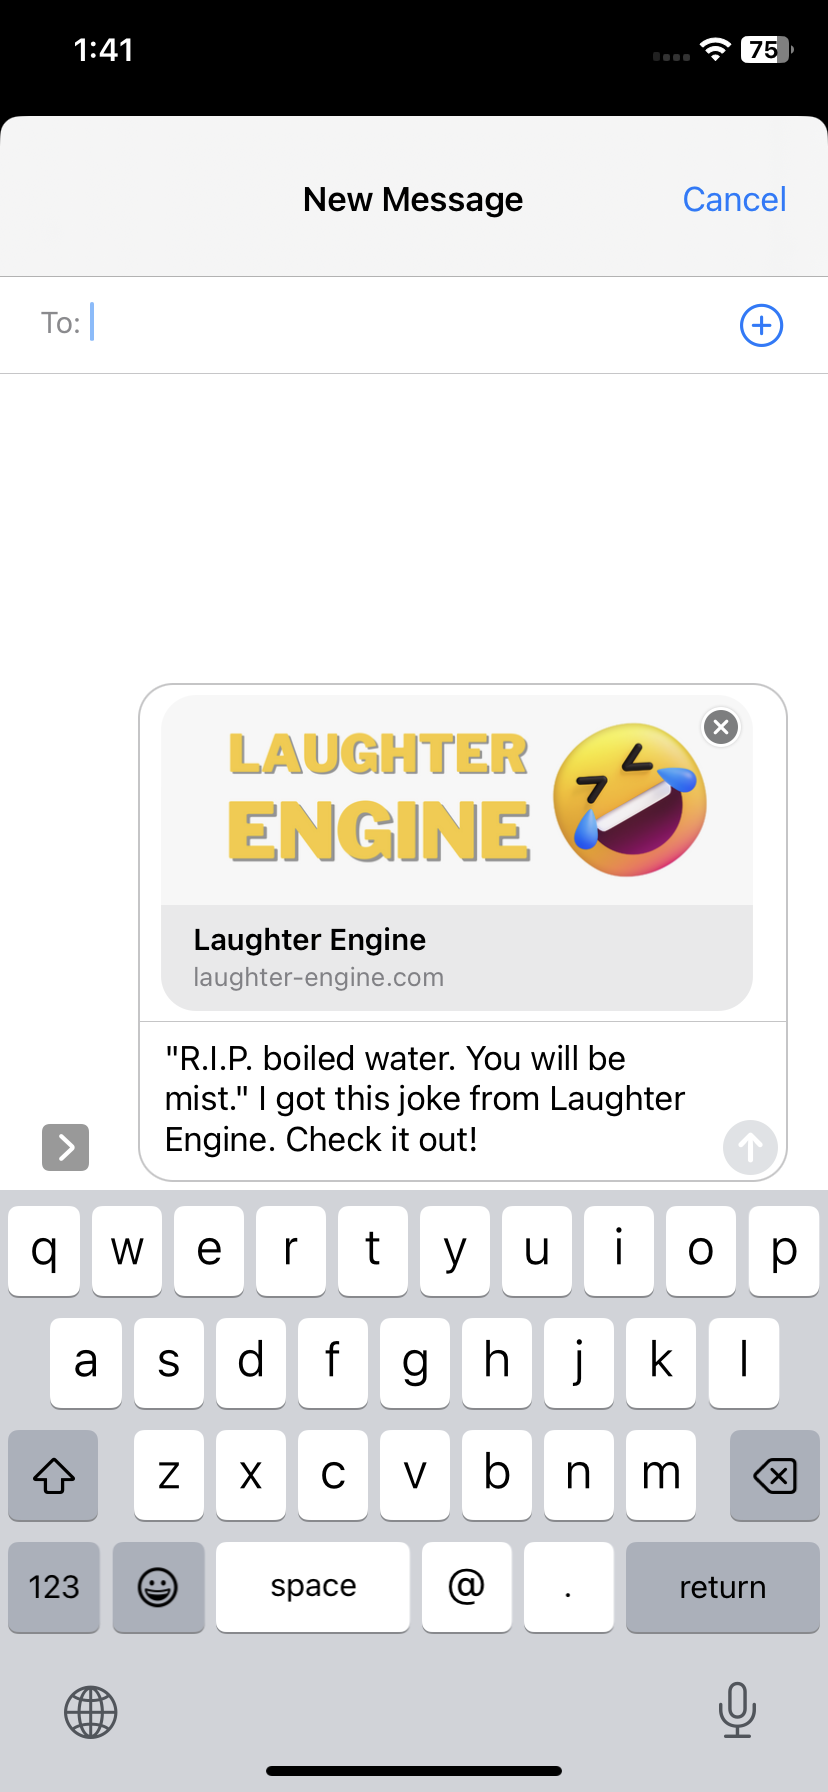
To that spirit I created a share button for mobile so that if you like a joke, you can easily share it with your friends which refers them to the product.
Things I learned
What would be the point of a blog post without discussing some of the major things I learned during the process of revamping this app, or share some of the takeaways if you will.
Sanitize your database inputs
Before doing this project I knew about database input sanitization, but hadn’t ever had to use it in real life since I’m mostly a front end engineer guy.
I learned while building this app that you must sanitize your database inputs or else bad things happen.
For example, one joke had an apostrophe in it Don't you think that... and that single character caused my backend function to crash out of execution since it told me t isn’t a valid character. What happened was that since I didn’t sanitize, it interpreted the ' character as the end of the SQL query since the query starts and ends with ' (i.e. 'SELECT * FROM joke_activity'). By sanitizing, we avoid those problems.
Netlify cares about accessibility, and I respect them more for it
Netlify is the platform that builds my React application and puts it out on the internet, and apparently they care about accessibility.
When I tried to publish the app, I mistakenly was using an image without adding an aria label for screen readers so that blind people could understand what I was trying to convey with the image. Netlify recognized this and failed to build my app and publish it.
When I looked at the logs, Netlify told me the reason for failure. I’m glad this company is putting its money where its mouth is for accessibility and they forced me to make my app more accessible to folks with visual impairments.
Serverless is incredibly easy to use
I have a newfound admiration for serverless. With a simple unix command of serverless, you can literally set up a backend Node server and deploy to AWS. No need to worry about scaling servers, no need to worry about setting up Express, no need to sign up for some expensive service. It’s so simple and easy to use. I intend on using this for future projects where I need to set up a backend layer.
Setting up and connecting to PostgresDB via bit.io is easier to use than MongoDB
When I first built the project, I built it with a service called MongoDB. While it was easy to set up to begin with, over time the company changed hands and the database disappeared. When rebuilding the project, I was going to set it up with the new MongoDB administrator called Atlas, but it was a pain in the neck to set up and believe it would cost me.
Instead I went over to Bit.io, created a new database with a click, and connected to it through the node-postres javascript package. It was easy as heck and I highly recommend using it.
Road map
Yes I built this laughter engine product, but the journey doesn’t end there. There is still lots to be done. Some ideas…
Incorporate different joke types via other APIS and allow users to choose which joke types they want to see
Improve the UX for the app so user can either swipe left or right similar to a dating app in order to rate the joke
Show a “loserboard” of worst jokes
Offer a way for users to add custom jokes
Add the concept of a user, so that a user can log in and keep track of their “liked” jokes, keep track of the ratings of jokes they submitted, and connect with other users that liked their joke. Could be a social network of sorts.
Warning Advanced: Let users create a video of themselves telling a joke and add that to the platform so stand up comedians can test out their bits with an audience
If any of these things may be things you are interested in contributing to, please hit me up.
P.S.
Before I wrote this post I told an AI bot to write it for me. I didn’t end up using it, but to show you the power of AI, this is what I got after telling it to Write me a blog post about building a full stack app that tells users jokes and let's them rate them to contribute to a communal leaderboard to find the best joke:
Creating a full stack web application: Dad Joke Hub
Are you tired of hearing the same old dad jokes over and over again? Look no further than the Dad Joke Hub! Our full stack web application is here to provide you with a never-ending supply of dad jokes, as well as a platform for users to rate and share their favorites.
The front-end of our web application is built using HTML, CSS, and JavaScript. We use a responsive design to ensure that the jokes are easily accessible on any device. Users can navigate through the jokes using a simple and user-friendly interface. Each joke is presented with a rating system, allowing users to rate the joke from 1 to 5.
The back-end of the web application is built using Node.js and MongoDB. Jokes are stored in a MongoDB database, and the application uses a RESTful API to retrieve and update joke data. User ratings are also stored in the database, and a leaderboard is generated to show the most highly-rated jokes.
One of the unique features of our web application is the ability for users to submit their own dad jokes to the database. This allows for a constantly growing collection of jokes, ensuring that there’s always a new and fresh dad joke to enjoy.
The Dad Joke Hub is more than just a collection of dad jokes, it’s a community. Users can share their favorite jokes with friends, and even compete to see who can find the funniest joke. So why wait? Come join the dad joke revolution and check out the Dad Joke Hub today!
Pretty cool right? Who does it better? The robot or me, the human?
Why compete when we can collaborate? My next project and post will likely be related to an AI powered app plan to build next. Stay tuned!
A software engineer is to his editor as a Samurai is to his sword
Who says I can’t make analogies from the software engineer to the legendary Japanese warrior?
Nobody!
Alright I admit maybe it’s a stretch, but without a doubt there are similarities of the warrior wielding his sword to fulfill his purpose to a software engineer using his editor to fulfill his or hers.
Yes, that’s right. I’m talking about the code editor, the thing the software engineer uses to write software. If you’re wondering the difference between other terms for this type of tool such as text editor, integrated development environment, source code editor and debugger fear not as you’re not alone and many of these terms are often thrown around recklessly.
At the simplest form a software engineer writes code with a keyboard just like a primary school student may write an essay with a word processor like Google Docs. In fact, there’s nothing stopping a software engineer from writing code in a barebones text editor such as TextEdit for Mac. Some folks even do! However they’d be missing out of the more powerful features that could be harnessed by more sophisticated tools. This is where code editors (or source-code editors) come into play. These tools such as Emacs, Sublime Text, and TextMate make writing code easier by utilizing some of the following tricks to make the life of a software engineer easier…
1. Syntax Highlighting
The text in code isn’t as free flowing as text you may see from reading a novel or essay. Rather, text from code is often dictated by keywords that have special symbols that have special meanings. Take the following example from my most recent project…
As you can see here, some of the keywords are a different color as they have special meaning in the code. In this case for, let and await are all keyboards that the programming language treats differently from other words. These keywords are reserved and the syntax highlighting makes it easier on the eyes to identify them.
2. Code completion
Let’s say I declare a variable in my code…
constname="Adriel";
I’ve declared a variable called name to be "Adriel". Similar to keywords described above, now name has a special reserved purpose since every time I refer to it I know it has the value Adriel. What would be very nice is if my code editor would autocomplete this variable for me as I start typing. That’s an example of what code completion does. So the next time I start typing na... then the code editor will suggest name to be and I can easily select that value with the tab key as I’m typing. This greatly reduces the change that I’ll make a typo while referencing a variable or a keyword for that matter.
3. Code search
Searching for text is a very common editing code or even browsing a web page. We all know the drill. Use your keyboard shortcut to start the search and get a list of places where the code is being used. However, code search within a code editor can be more fine tuned and specific to make sure you’re getting exactly what you’re searching for. For example, you may be searching for something that is case sensitive, a word isolated on its own, or for a specific piece of code only showing up in specific file types. With a code editor you can specify which file types to include your search and which file types to exclude. If you found the piece of code or exported function used across apps and how to change it that brings me to my next powerful tool…
4. Refactoring
Say you found the exported function that you were looking for, now it’s time to change the name of it. You could do a find and replace from the old string to the new string… but that could have negative side effects if you have another exported function in some other file with the same name. Instead, do a refactor to ensure that only the correct function is renamed and the other unrelated one remains the same.
What about Integrated Development Environments? How do they fit in?
Integrated Development Environments (IDE’s) such as JetBrain’s Webstorm, IntelliJ are also very powerful tools to write code and generally go above and beyond text editors and code editors combined with the services it offers. It offers built in tools such as debuggers so a user can step through they’re code while executing and version control integrations so the developer can easily reference the cloud hosted source of the code repository on platforms like Github. While these tools are powerful and useful, they can be expensive, resource intensive, and can pose a steep learning curve. Those that seek a free, delightful, incredibly flexible platform to develop code may benefit from using my favorite and very popular coding tool…
Visual Studio Code
Developed by Microsoft in 2015, this free code editor offers it all. While technically not an IDE, it can pretty much offer all an IDE has to offer since it has an extensive marketplace of addons called extensions. So if you download Visual Studio Code on its own, you will have what is very close to a barebones text editor, but if you take advantage of all the incredibly useful extensions that Visual Studio Code has to offer, you have access to all the tools you need to build great software with ease!
As I reflect on my career thus far, I like to think about the different work environments I’ve been a part of and how they compare with each other.
Every job has it’s pros and cons and I don’t intend to pick favorites. Rather, I’m conducting a comparison in order get closer to finding the optimal way of developing software.
So let’s compare Job A with Job B…
Software development methodology
Job A
Job B
Framework
Scrum
Scrum
Sprint Length
3 week
2 week
Standup Length
5-10 min
15-25 min
Grooming per week
2 hr
1hr
Retrospective
Yes
No
Story point estimation
Yes
Yes
Both companies embrace scrum principles and strive to implement it into daily life. I feel like company A followed scrum a bit more strictly than company B, however that doesn’t necessarily make it better.
I liked how in Job A had a strict time box for standups and made sure not to go over.
Although we did retrospective after every sprint in Job A, I didn’t necessarily think we gained a lot from doing it. In fact, I think sometimes people were just not really sure what to say during retrospective.
In Job B we’ve skipped past retrospective. I can’t say I miss retrospective very much, however I do think it would be nice to do it every once in a while or just for 15 minutes.
I’m all for continuious improvement, but to have to come up with a concrete plan of what to change process-wise for each sprint is a bit overkill in my opinion.
Localization
Job A
Job B
Localize strings in App?
Yes
No
This one caught me by surprise. Although I had only worked one job professionally as a front end engineer before starting Job B, I had thought that all companies followed this practice.
As it turns out company B hardcodes english strings into the app. The company does have customers who work in other languages, however apparently the foreign customers have memorized where to click.
Not worrying about internationalization makes it a bit quicker to develop, however something feels wrong about it. Even if we had only supported English I would feel better about using localization functions. I especially feel this way after turning my app into spanish mode and seeing the product I built suddently switch to a different language which I wouldn’t be able to do with Job B.
Code Base Structure
Job A
Job B
Microservices?
No
Yes
Monolith?
Yes
No
In this regard Job B wins the prize simply because webpack compilation time is way faster in Job B. I remember in Job A it wouldn’t take a painfully long amount to time to reload the app after making changes. This was mostly because webpack was trying to compile so much es6 that it couldn’t possibly to it fast enough with Babel’s current capabilities.
This makes life much easier. In fact, when I first started at Job B I was delighted to see how fast I could start running the app.
Running Front End Apps Locally
Job A
Job B
API running locally
Sometimes
No
Job B wins in this respect. In order to run front end code locally, all developers have to do is specify which environment they want to use for a backend. To do this, all the developer has to do is update a config file specifying to environment.
React
Job A
Job B
Webpack
Yes
Yes
Redux
Yes
Yes
NPM/Yarn
yarn
npm
Jest
Yes
Yes
Snapshot testing
Yes
No
Thunks
Yes
No
Hooks
No
Yes
Sagas
No
Yes
Lodash
No
Yes
CSS Extension
CSS Modules
Less
In Job A, things were more consistent but less experimental. For example there was only one team deciding which patterns an technology to use.
In Job B, each team is empowered to make their own technology choices. For example the team that I am on is the only team that uses React hooks. I find hooks to be extremely useful. They greatly reduce the complexity of connecting to a Redux store and dealing with retrieving data form and manipulating the store. The only disadvantage I see to hooks is that it makes it a lot trickier to split big components into small ones. Often times with hooks a parent component controls all the state and passes it down to its children though too many props. Since hooks use local component state, there ends up being multiple stores of data. Still I think the pro’s of hooks outweight the cons.
In general I like how each team is empowered at Job B to make their own tech choices and then come together with other teams to discuss the best ways to do things.
QA Testing
Job A
Job B
Separate quality engineers
Yes
Yes
Separate engineer for manual UI testing
Yes
No
Each ticket gets passed through the quality engineer
Yes
No
In Job A, each ticket that was completed went to a quality engineer. The ticket could only be considered done if that engineer signed off on it to assure it met it’s criteria.
In Job B, there is a separate quality team, however that team only focuses on integration or end to end testing. There is no separate engineer to manually test UI stories and it’s up to all the engineers to do these checks.
In my opinion Job B has the better method. Although they sometimes do find bugs, I think it’s a bit silly to have a separate engineer to manual tests. Manual testing is important to do but I don’t think it needs two separate engineers to do it because…
That means two engineers have to get all their settings in the right spot to test the behavior in the UI. This could often mean setting other things up, having these engineers collaborating together to get the other one up to speed, etc.
Manual testing is not very valuable because it can’t be run automatically. Any manual test that you do today and mark as complete could very well break a month from now if somethng else changes. Unless that quality engineer can put a non brittle automated test on it, it’s not worth it in my opinion to get two sets of eyes on it.
All enginners should be in charge of quality. If a UI engineer is not manually testing features or fixes with various edge cases, then they are not doing their job well.
In Job B I feel a bit more free and empowered to move quickly, knowing that I can mark a story as complete all on my own. In Job A, I often got slowed down by marking a story as complete, having it get kicked back, and having to context switch back to working on the story. This especially got bothersome if it got kicked back for reasons that I didn’t think qualified as getting kicked back which was subjective.
In summary, I enjoy the practice in Job B more by the ability to move quick and take responsibility for my features/fixes, however I do feel like having a separate set of eyes on the tickets helped to ensure quality.
Company Culture
Job A
Job B
Weekly lunches
No
Yes
Work from home
Yes
Yes
All engineering in office
No
Yes
Both companies allow employees to work from home, however I notice a bit more at Job B. The floor plans are a bit similar, with all engineer sitting it a clump of desks together.
A big difference is that in Job B, almost everyone in the office is either an engineer or engineering manager. In my opinion this creates a bit more of a collaborative environment because we’re all in the same boat. Also the weekly catered lunches bring the team together and helps people get to know each other, something that has a lot of value when it comes to get people to feel like a team.
Deployment
Job A
Job B
Scheduled on regualr invervals
Yes
No
Has dedicated telease engineers
Yes
No
In Job A, I had nothing to do with releasing our software. My job was to commit code to the master branch of our repositories. After the sprint ended and on a specific time window a release engineer would deploy our software to production environments in a process I was unfamiliar with.
In Job B, the engineers building the software are responsible to releasing software to production. There is no set interval when the code gets released, rather it gets released when a product manager asks for it. Deploying is as easy and running a command on a terminal.
Both have their ups and downs. Job A was nice because I never had to worry about deployment and I could just focus on building. However Job B is nice because I have more control about when to release, and it empowers me knowing I have the ability to get features or fixes into the hands of customers all on my own. This doesn’t come without it’s drawbacks though. In Job B, there is often confusion about which versions of software are running on which environments and sometimes it’s not clear what has been released and what hasn’t.
Code Review
Job A
Job B
Inter-scrum team code reviews
No
Yes
“Approved pending comments” reviews
Yes
Yes
In both jobs, a common practice is to leave a couple of suggestions or point something important out, then approve a tell engineer to address comments before merging to unblock them. I like this approach because it allows the engineer to move forward without having to wait again to make changes and get the reviewer to take a second look.
The biggest difference between the two jobs is that in Job B, an engineer might be reviewing another engineer’s code who is on a different scrum team. In fact there are times where one engineer is pretty unfamiliar with the feature or fix that is happening in the pull request.
I haven’t made up my mind here about the best way to do it. On the one hand, it’s good to get a bunch of diverse eyes on some changes to enforce a unified code base across teams. On the other hand, an inter-scrum team engineer might not understand the context of the code and it probably won’t be worth them to get up to speed on it. In this case, engineers typically review based on code style, not on functionality or anticipated use cases.
I think it comes down to whether or not a shallow or deep review is considered necessary. I still don’t know the right answer to this, however I prefer giving shallow reviews because it minimizes the degree of context switching an engineer must do.
Task Management
Job A
Job B
Jira
Yes
Yes
Creator of tickets
PMs
Developers
Strict ticket format requirements
Yes
No
In Job A product managers created the tickets and then engineers reviewed them and added detail or corrections. I feel like this approach is a bit flawed because product managers don’t have as much of a grasp of the amount of work to complete each feature or bug fix and therefore it will be more difficult for them to come up with roughly bite sized chunks of work. In Job B, product managers discuss the work that needs to be done and answer questions about it, however it is up to the engineers to create tickets. Before bringing them into the sprint, these tickets are groomed to provide clarification to the team and estimates.
Optimism is supposed to be good for you, right? Here’s some benefits I found after doing a quick internet search for its benefits.
It builds resilience in the face of adversity.
It promotes self respect and integrity
It creates a sense of fulfillment and satisfaction.
The list goes on and on, but they never mentioned the benefits optimism provides to software users when computers use it.
For example, let’s say somebody is dragging some sort of row into a folder…
In the example the user drops the row into the folder, but it takes a second or two before the row actually moves places.
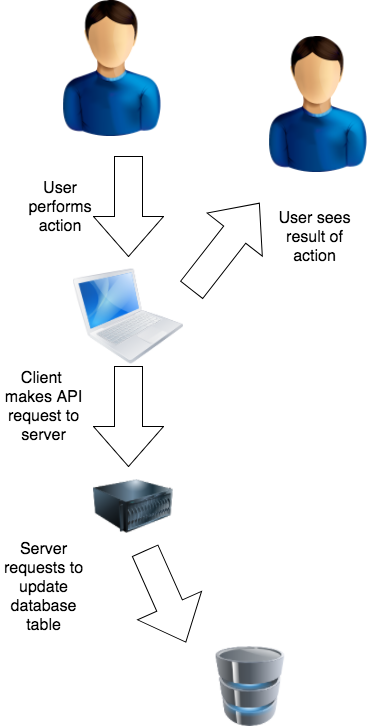
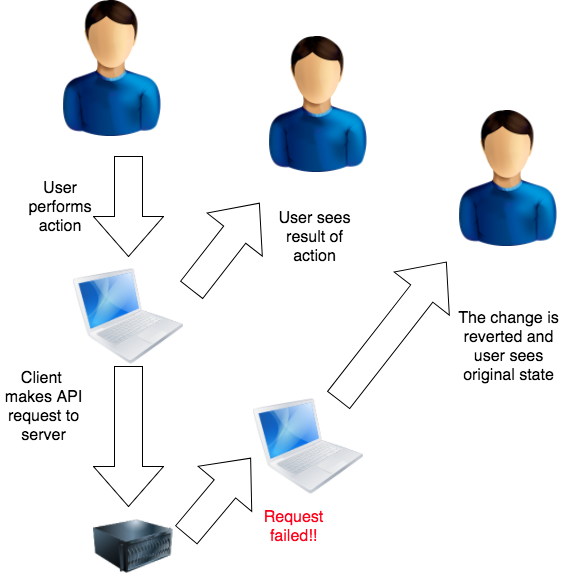
Why does it take so long? Because the client makes a request to the server which then makes request to database to change a table value. After all these operations happen and the success message is sent back to the client, then the UI updates.
In order to make the UI appear more responsive and fluid there’s a little trick called optimistic update. Instead of waiting to hear back from the server, the client updates the UI instantly and sends off the API request, hoping that it will succeed.
Now doesn’t that look much better?
Our new diagram after optimistic update looks like this…
Now one might argue that’s it’s unethical to update the UI before the change has gone through. The user is being lied to before it has been confirmed that the operation succeeded.
So is it okay it lie temporarily in order to make the UI appear more response?
I’m not trying to promote lying to solve problems. What I can say is that sometimes a little lie is okay.
In this case, it’s not the end of the world if the request fails. Yes, the user will be confused when they refresh and see the row didn’t get placed in the folder, but this operation is not terribly critical and will probably succeed 99% of the time.
And for the 1% of the time where the request fails, we can even correct the UI to reflect that and revert the change.
Despite how clever optimistic update is, there are some times where we would never want to use it.
Let’s say the operation was to do something important like purchase a flight ticket, then that little lie could have really bad consequences. Say the user tried to book the flight, it appeared successful in the UI, the user closes their browser, and then an error occurs on the backend. Somebody would have falsely though they booked the flight. In this case optimistic update is not suitable.
Just like optimism, optimistic update is a powerful tool. Use it to your advantage!